Monday, January 21, 2013

Swing Cards

I am ABSOLUTELY loving the newest Close to My Heart Cricut cartridge!  If you don't have yours yet, get with me!  This is a great time to buy as you can get the exclusive Who's Your Valentine set (a $40 value) for just $10!  Email me at amydaycreates@yahoo.com for all the information.

What I want to show you today is one of my favorite features - swing cards!  I love, love, LOVE these!
The Cricut Artiste cartridge cuts 9 different swing cards; and both Artiste and the original cartridge, Philosophy, have coordinating shapes to go with the swing cards.

Red Letter Journal's January card club theme was Your Fav Techniques.  For my cards, I chose to use 2 different favs - swing cards and heat embossing.  With Valentine's Day just a little over a month away, I knew I wanted to use my new Love stamp.  Look at how perfectly it fits the heart swing card.
I knew I wanted to cut out a red heart to attach to the swing heart and that I wanted it to be slightly smaller than the swing heart.  The really nice thing about the stamps that work with the cartridges is they tell you which cartridge to use and what size to make your cut.  Notice on the Love stamp that the lower left corner says it is on the Artiste cartridge.  On the right side, you can see a size and page number.  I know I need to go to page 51 in the Artiste book and set my Cricut to 2 3/4 inches for my red hearts.
What I have to figure out now is how big to cut my swing card.  You know how most scrapbooks come with white paper in the page protectors?  I save those for "scrap crap" paper, and I use those for projects like this - when I need to test the sizes of cuts.

I started with 5 1/2.  Notice that I cut a white heart and darkened the edges so I could see how much smaller it would be.
Next I tried 5 inches.  You will notice in the 5 inches that there is barely any white around the edge of the swing portion.
I decided to go with the 5 1/2 inch and started cutting the cards.  I used Bazzil's Swiss dot paper which has a dry embossed Polk-a-dot pattern.

With the card bases cut, it was time to move on to my other fav technique - heat embossing!  I had my Love stamp mounted on my acrylic block, my Perfect Medium from Ranger, my red hearts, silver embossing powder, and the most critical tool to good stamping - Close to My Heart's foam mat.
To heat emboss, start by loading up your stamp with Perfect Medium.  Be sure to use the tap, tap, tap, and turn method to get a good even layer of Perfect Medium.
Next, line up the stamp with the paper.  Close to My Heart's clear acrylic stamps make this so easy!  It is the reason I fell in love with Close to My Heart . . . that and no bulky wooden blocks!
Notice how the Perfect Medium leaves a darker shadow of the stamp.  This is sticky and will hold the embossing powder.
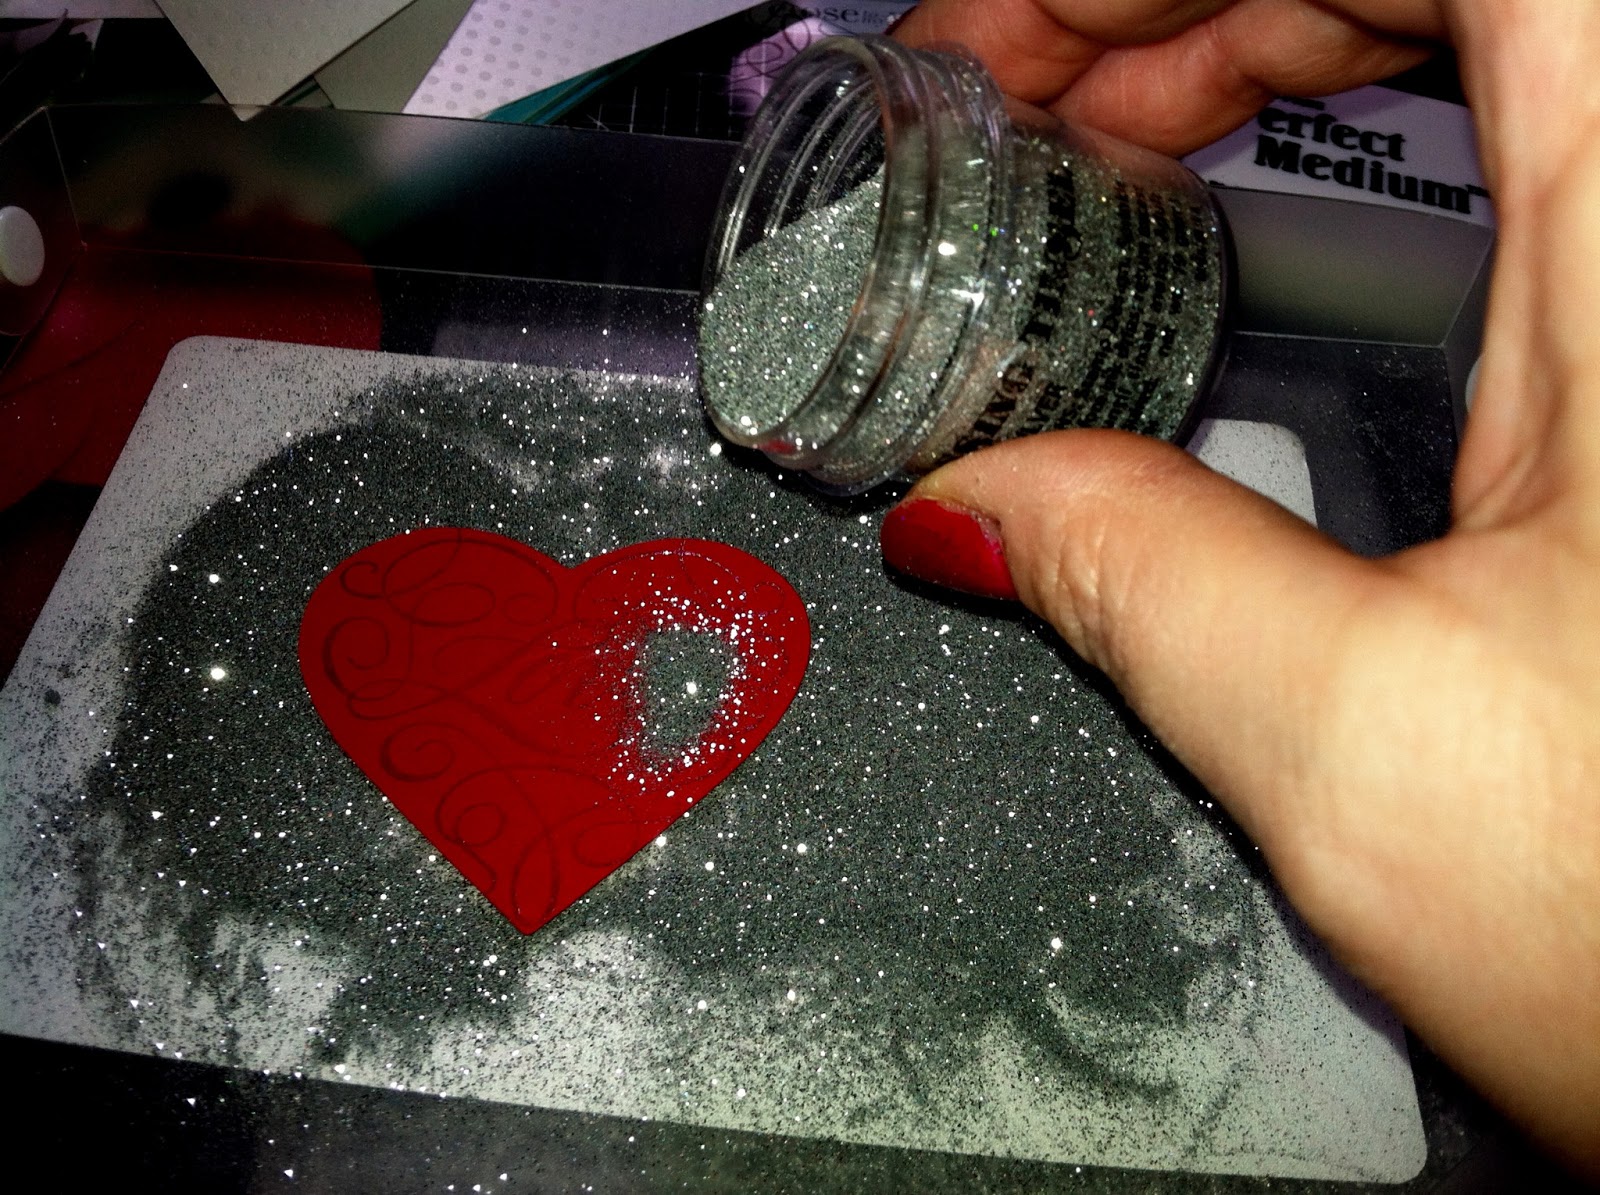
Now, it is time to sprinkle, sprinkle, sprinkle!  OOOHHHH, pretty!  Sparkly!
After covering the surface with the embossing powder, carefully pick it up, give it a shake, and even give the back a little flick.  The point is to get the extra powder off the paper so that the only powder is stuck to the stamped image.  You can even use little paint brushes if you need extra help.
Now for the magic!  This is my favorite part!  As the embossing powder heats up, it melts and gets very shimmery.  You can see the change in the second picture.  The top has melted and set.
Here's a good comparison of before and after.  The heart on the left is finished, melted, and set.
Now for the final product!  Thanks to Cricut, this card was super simple.  I'm really happy with how it turned out.  It may be my fav card yet!  All I had to do was adhere the embossed heart to the front and three gems to the bottom right corner.  I also adhered a plain red heart on the inside to give the sender a place to write.
Next month's card club theme is Ombre.  Essentially, it is monochromatic (all the same color in varying shades) only you take the shades from light to dark.  Card club meets the first Sunday of every month at 3pm.  To join in, message me and/or give the store a call at 614-539-3900.  It's a good way to learn new techniques and make new friends!


Thursday, January 10, 2013

Baby Books

One of my favorite things to make for baby showers are little chipboard baby books.  They're fun, quick, and easy.  All you need is a little book (I prefer the chipboard books that spell "Baby"), a cute line of paper, coordinating card stock, and embellishments. 

I made the following book for one of my coworkers.  I found the paper line and embellishments at Archivers and was able to put it together in the matter of a few hours. 
I love the colors and the way it turned out.  It's so cute, but not as cute as Samantha!


Wednesday, January 2, 2013

Boxes & Bows . . . The Bow Part

After making my totally cute Christmas box, I was left with some scraps.  What to do, what to do . . .  How about I make a bow!  It is super easy and super cute! 

Start by cutting the scraps into the following amounts and sizes:
This part of the process is extremely flexible.  Need a bigger bow?  Increase the inches.  Need a smaller box?  Take a guess . . . yep, decrease the inches!

Starting with the longest strips, loop the paper like this:
Next, using your paper piercer, poke through both layers of the paper.  The location of the whole does not have to be precise.  Continue this process with all pieces of paper.
Take four of the 6 inch strips and connect them in the shape of an "X" using a brad.  I like to use my "crappy" brads for this.  The look of the brad does not matter as you will never see them.
Here's the view from the top:
Continue this process until all strips are connected.
To give your bow a little more depth, try switching the direction of your loop on the 5 inch and 4 inch pieces.
Now, grab your trusty glue gun!  The consultant that taught me how to make these bows used pop dots, but I find that hot glue works better.  Put a glob of glue in the center of the first 6 inch X and stick the second 6 inch X on top.
Repeat the process using the 5 inch X, 4.5 inch X, and 4 inch X.  As you adhere the pieces, you will want to rotate the angles so the the legs of one X is in the split of the X below it.  The picture above is good example of what I'm talking about.

As you are attaching your pieces, you may find yourself thinking, "This looks weird.  I must be doing it wrong."  Do not fret.  I promise, in the end, it will all come together!
We're not done yet!  You should have a remaining piece around 1 inch by 1.5 inches.  Take it, and attach the ends to make a tube.
This little fella goes in the center of the bow to hide the brad.
Viola!  You now have a beautiful, handmade bow!  The possibilities really are endless.  Notice the size differences between the three bows.  The left bow was made using 6, 5, 4.5, and 4 inch strips.  The middle bow was made using just the 5, 4.5, and 4 inch strips.  The bow on the right was made using 4.5, 4, and 3 inch strips.  Notice the difference not only in the size but in the tightness of the loops.  The bow on the right is definitely more difficult as there is less paper with which to make the loops.
So, what types of bows will you make with your scraps?!


Tuesday, January 1, 2013

Boxes & Bows

From the looks of the paper, this post is a bit late; but the techniques and tools can be used for any occasion or holiday.  Just swap out the paper.

Let me just say, I am L-O-V-I-N-G the new Close to My Heart Cricut cartridge - Artiste.  With over 700 items for the cutting, I could cut for a week straight and not repeat anything!

For Christmas, I decided to try out some of the 3D items.  Since I wanted something to make gift cards a little more exciting, I chose to try out a thin box.  CTMH's double sided paper is perfect for this as the inside and the outside of the box can both be pretty!
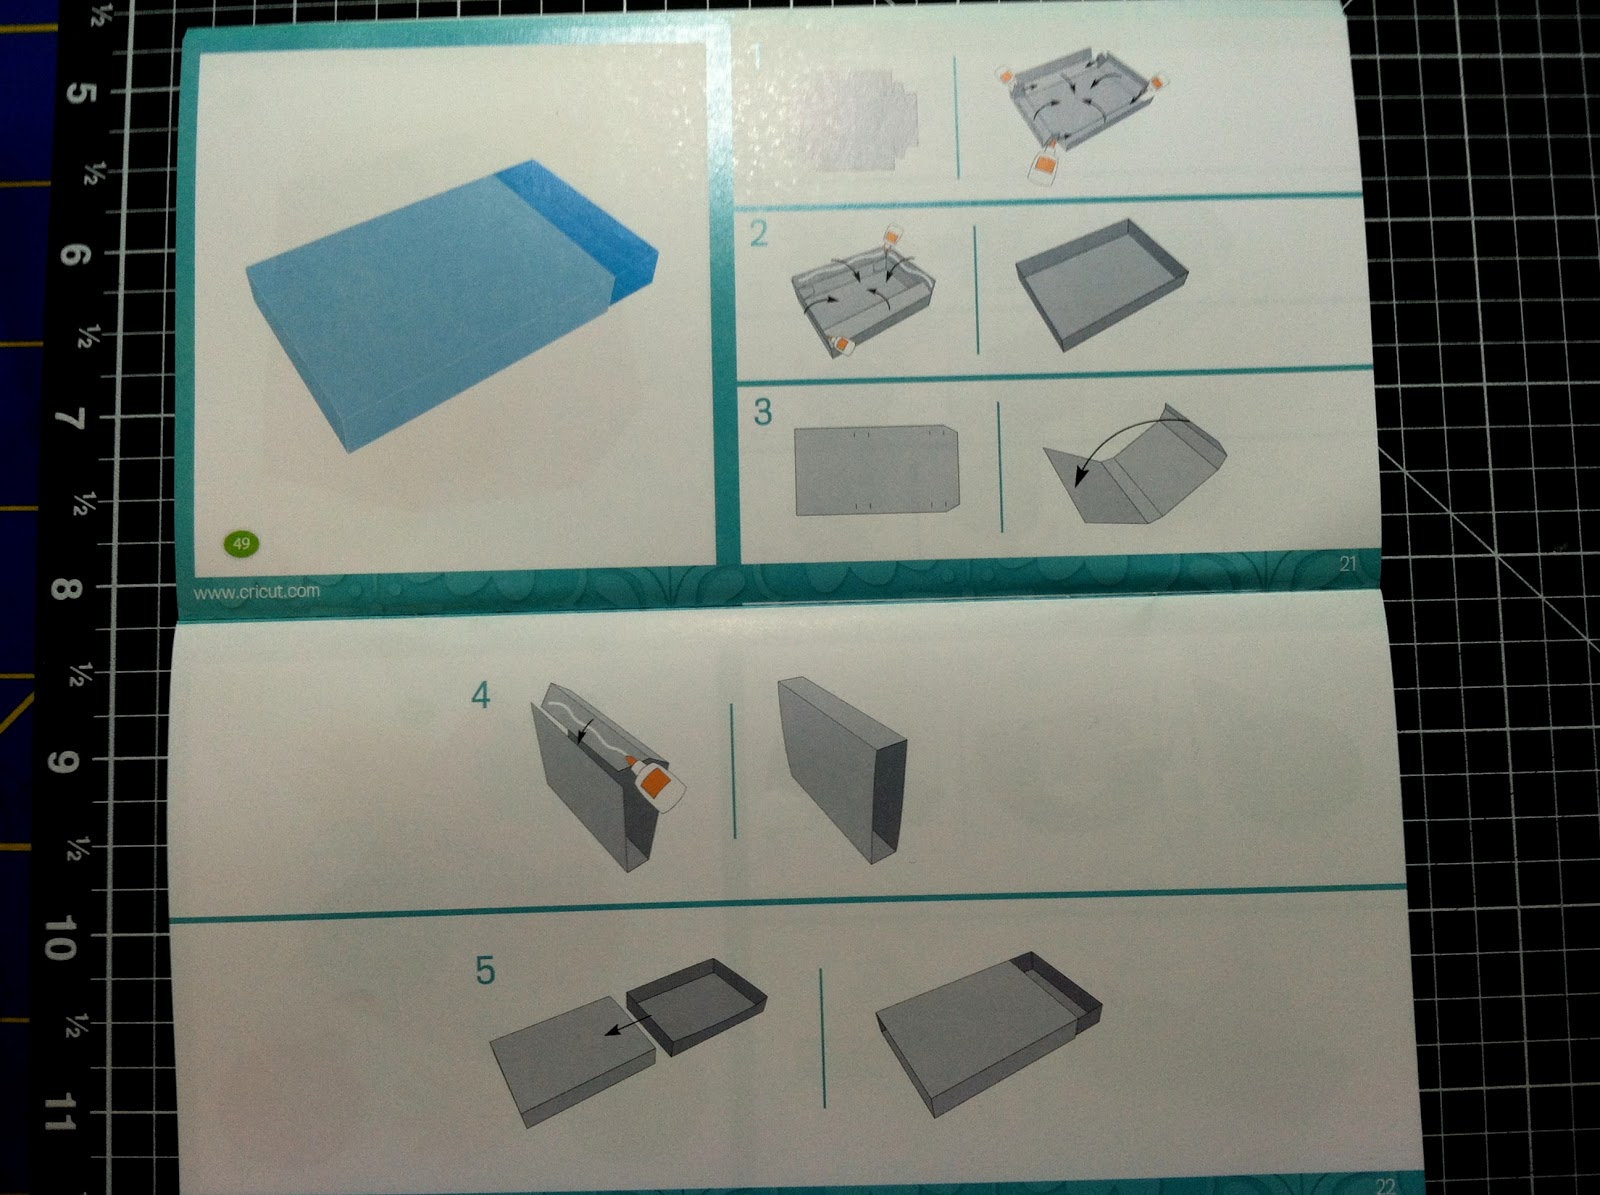
 This cartridge comes with two booklets - the traditional one and a 3D booklet which helps with assembly.
 After finding the item I wanted to cut, I set the size on my Cricut to the recommended size of 6.5 inches.
Within seconds, I had the bottom of my box!
If you look closely, you will notice tiny slits in the paper.  These are meant to guide you on where to fold as well as to make the folding easier.  Even with these guides, I prefer to score the paper as it ensures a good, strong fold.
The 3D guide makes it extra easy to assemble the box.  While the instructions show liquid glue being used for assembly, I highly recommend using Score Tape or that really strong double sided red tape.  Either will provide a very strong bond.
Check it out - the bottom is done!  How cute is this?!  Stripes on the inside and plaid on the outside! 

Now for the sleeve . . .  Following the booklet guide, I left the size at 6.5 inches only to get this message:
What the . . . uuummmm . . . how's this going to work . . .
In a word, it's NOT!
So, the guides . . . not so accurate . . . I guess if I had a 12 x 24 mat, I could have made it work, but I don't.  In the end, I simply redid the bottom to the smaller size of 5.5 inches. 
In the end, the box turned out extremely cute!
Want to find out how to make a bow out of the scraps?  Tune in tomorrow for the how to!


Friday, April 6, 2012

Easy Peasy!

Handmade gifts don't have to be hard.  They don't have to be time consuming.  They don't have to be expensive.  For just a little cash and a little time, you can provide a loved one with a special gift that they will ooh and aah over!

Here's a great example!  This is a simple chipboard book that a friend and I created for one of our coworkers.  Our only cost comes from the paper and the pictures.

Every year, at benefits renewal, I get packages of brochures and posters advertising our health, dental, and vision benefits.  Each packet comes with a piece of chipboard to provide support.  I use to toss the chipboard along with the plastic covering until a coworker pointed out it would be great for scrapbooking.

I took several of the 8.5x11 sheets of chipboard and cut them in half to make the pages for the book.  We then used a cute paper pack to cover each page.  I picked the paper pack up at JoAnns for just $9.99, and I have a TON of it left.  It was perfect for our retiring coworker who is a nature lover.

One sheet covered the front and the back.  Everything except "Happy Retirement" was printed on the paper, and the Cricut made cutting the title quick and easy.  Once everything was put together with the binder rings, we tied pieces of ribbon on the rings for added cuteness! 


For the inner pages, all we did was cover the chipboard with the cardstock, mat the pictures, and add titles.


We were probably done in under 2 hours, and she LOVED it! 

Workshops On The Go

One of my absolute FAVORITE products from Close to My Heart is the Workshops on the Go.  For just $29.95 ($34.51 after shipping and tax).  If you have never seen one of these, you are in for a treat!  I cannot say it enough - I LOVE this product!!!

Each workshop comes with the following:
  • My Reflections paper pack (six 12x12 double sided sheets of patterned paper)
  • Six 12x12 sheets of coordinating cardstock
  • Exclusive CTMH acrylic stamp set only available with the workshop
  • Instructional brochure
  • Coordinating embelishments
The instructional brochure provides great cutting and stamping instructions to ensure you get the most out of your workshop.


Just look at everything I was able to make with the Fanfare Workshop on the Go!  For just $29.95, I was able to make 2 double page 12x12 scrapbook layouts and 24 cards! 


Plus, I had all of this left!  There's a full 12x12 piece of paper, lots of great paper pieces for cards, and the acrylic stamp set!

Before you fall too much in love with Fanfare, I have to warn you - this workshop is no longer available.  The workshops are only available during the life cycle of the catalog.

Never fear, CTMH has 8 - yes 8! - great workshops available now!  Check them out at Workshops on the Go.

Sunday, April 1, 2012

Shout Out to My Peeps!

When I saw the My Peeps stamp set from Close to My Heart, I KNEW I had to have it!  Each Easter, I could eat my weight in Peeps!  Then I saw the Lucy paper pack, and the wheels started turning!  Granted, I did crop lift the basics of the design from the Idea Book, but that's what it's there for - ideas!

Here's the finished product!


I just love the colors and the Peeps are way cute!  But . . . my favorite part ended up being the flower.  This card ended up serving double duty - my Easter cards and my cards for this month's card club.  The theme for the card club was texture.  I punched one layer of the flower out of Sweet Leaf card stock and the other out of Creme Brulee.  To give them texture, I dry embossed each with a different embossing folder.  Chunky glue dots were used between each layer, and a button tied with CTMH Baker's Twine.  You can see why it's my fav part of the card!
To give the Peeps some texture, I flocked each of them.  This was my first time using flock, and several times I uttered, "What the flock?!"  It's cute but not much fun to use.  A fellow scrapper said I should have sugared them.  She was right, that would have been way cute; but after flocking with the flock, I wasn't about to redo my Peeps! 

To attach the Peeps, two were simply adhered to the card.  The middle one was attached using the new Adhesive Spring from CTMH.  It really makes the Peep "spring" to life!  If it was a real Peep, I would say it was jumping right off the card and into my mouth!!!
Last but not least, my favorite part of the stamp set - the sentiment!  Happy Easter to my Peeps!
For now, I say, "Good night to my Peeps!"